Your excavation is all done and you finally have something to look at on your piece of property. Exciting isn’t it?? It’s amazing how happy moving some dirt around can make you feel!
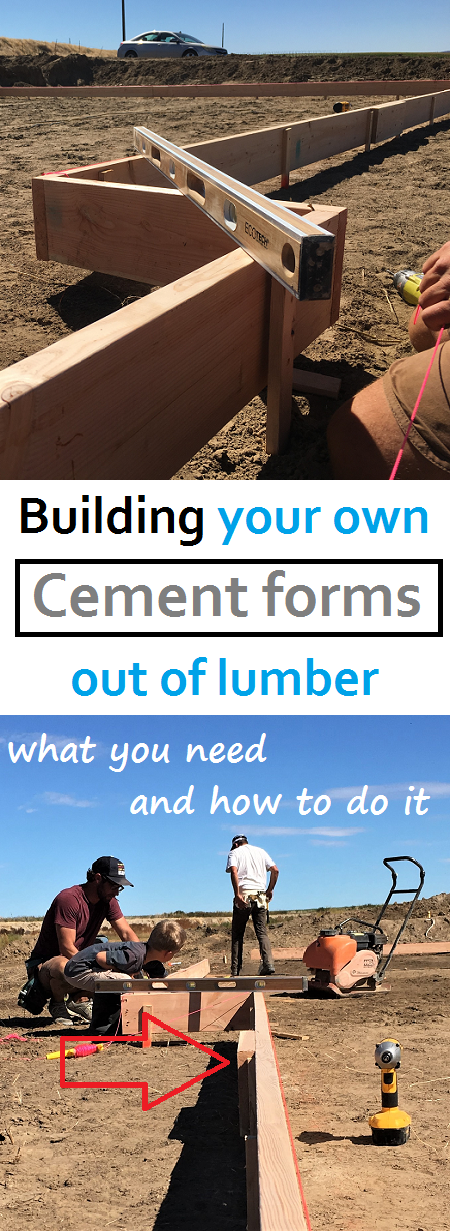
The next thing on your list is to pour your cement footings.
A footing is the bottom part of your foundation wall. It will be poured a little wider then the wall itself because it will be supporting all of the weight. It looks kind of like a foot sticking out at the bottom of a leg. Thank goodness for the genius who named it something that all of us non-construction folk could figure out!
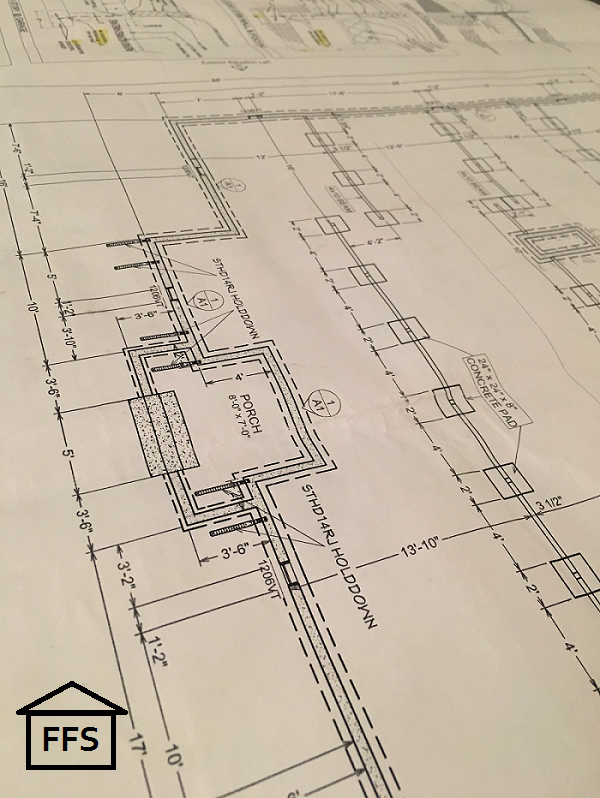
Here is a picture of what it looks like on my blueprints. The footing is the rectangle part that is highlighted 16″ x 8″
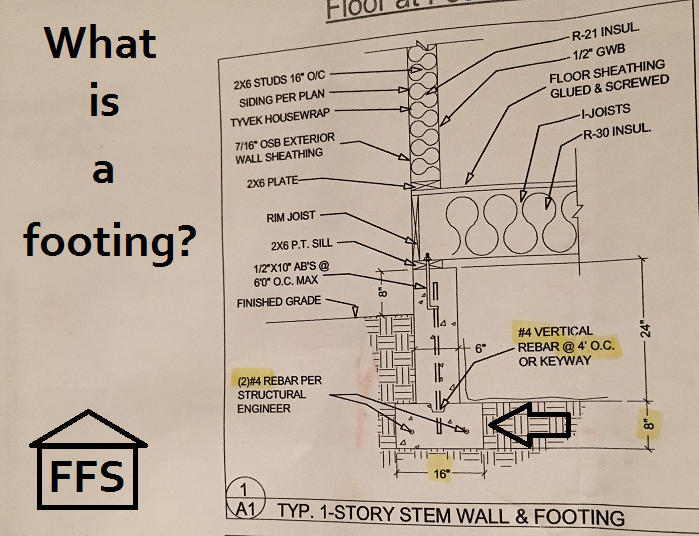
So this wall of cement is poured all the way around the outside of my house. The weight of the entire house will sit on these walls so they have to be poured the way your plan says to do it. The footing is the wide part at the bottom, and then the stem wall is the skinnier wall of cement on top. There is metal rebar stakes put inside the cement to hold the two together.
In most cases, the footings and the stem wall have to be poured separately. So first thing to do is to pour the footings.
But before you go pouring a bunch of cement, you need to prepare a place to pour it.
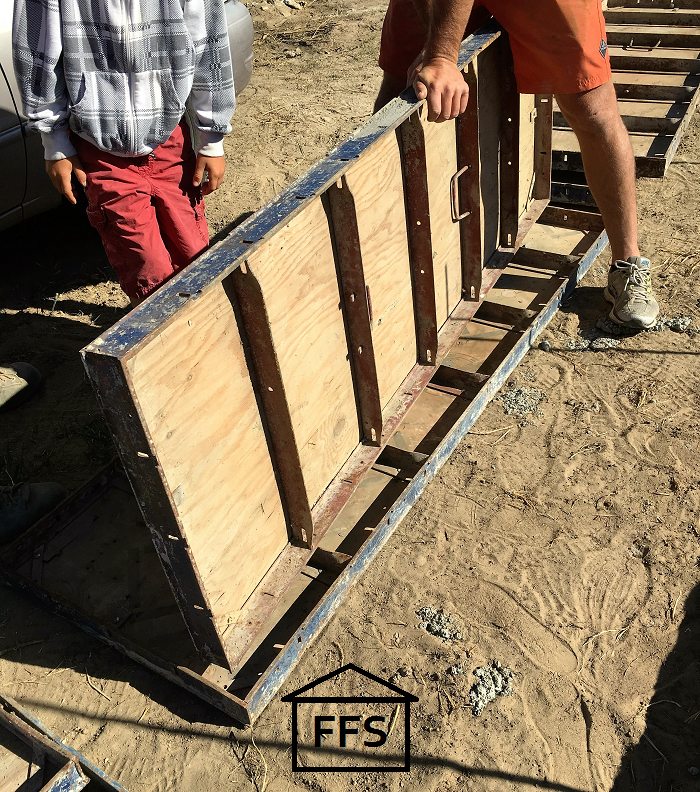
You can buy or rent manufactured concrete forms so that you don’t have to build them. We used them later for our stem walls because of their size. Here is what one of those looks like:
However, you need to consider all of the factors before you decide what will be best.
- What size wall are you pouring? Concrete forms come in specific sizes. The ones we looked at were 24″ and 48″ tall. Our footings were only supposed to be 8″ tall, so using 24″ forms would be pretty difficult.
- How much cement are you pouring? If you are building a large house then you will have a lot of forms to build. Manufactured forms cost money, but so does lumber to build them yourself. You need to compare prices on the forms you can rent vs the lumber price to build them.
- How much time do you have? Look at the concrete forms and how they fit together. Some are simple, some are not so simple. Will it be faster to put the concrete forms together, or faster to build some out of lumber?
In our case, concrete forms would not work for the footings. They were too tall so it would have been almost impossible to make 8″ tall footings with 24″ tall forms. Time was not a factor because I have done my very best to make sure we are not rushed for anything. (Which is one of my highest recommendations FYI) And as a bonus, our framer suggested that he could re-use the 2×8 lumber needed for the concrete forms in the framing of the house later. If it is on the inside of a wall it doesn’t really matter if there is a little cement on it.
So we went with standard 2×8’s to build the forms for our footings. It came out to $550 in lumber, to form up the exterior of our 4,000 square foot house plus our 700 square foot attached garage.
Everything you will need to build concrete forms
Here is what we needed for our forms:
- 2×8 lumber in 16′ lengths (we bought 55)
- 18″ Wooden Stakes (200ish)
- String (2 big rolls)
- Level
- Chop saw
- Measuring tape (100 feet)
- Carpenters pencils
- Spray paint (the kind made to spray on dirt upside down)
- Plate compactor (to compact the dirt if needed)
- Screws (a lot!)
- Drill
- Sledge hammer
- Square
- Square nose shovel
- Cutting table/Saw horses
- Generator (because we didn’t have temporary power set up yet)
- Extension cords
Before we started, we checked our blueprints thoroughly. It’s imperative that you understand everything your blueprints are telling you. Don’t feel stupid if it all looks like gibberish, that’s how I felt, you just need someone who can read one to walk you through it.
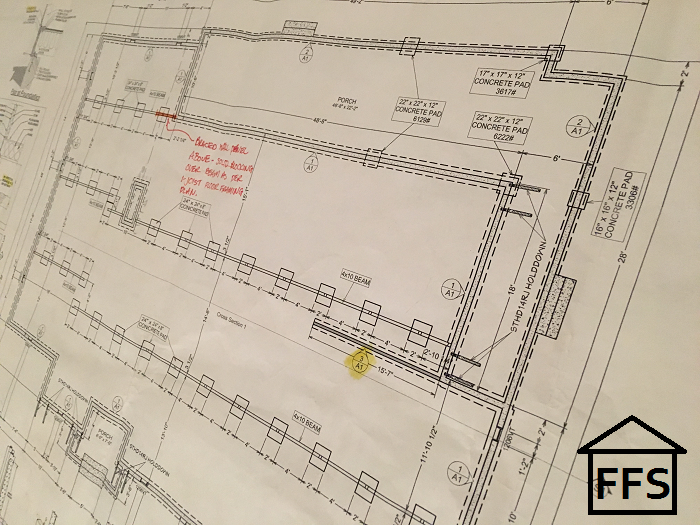
This is a picture of our foundation blueprints.
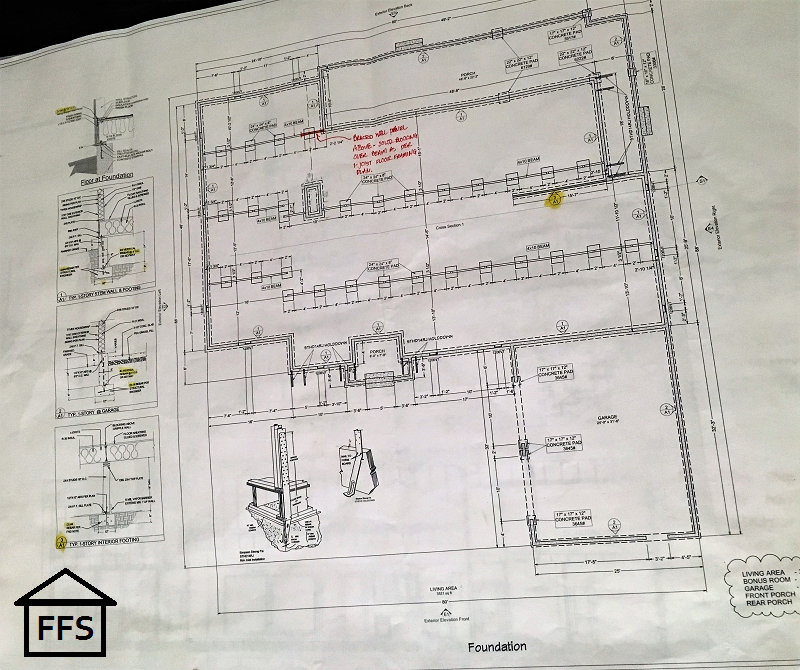
The footings are the dashed lines, slightly wider than the grey stem wall.
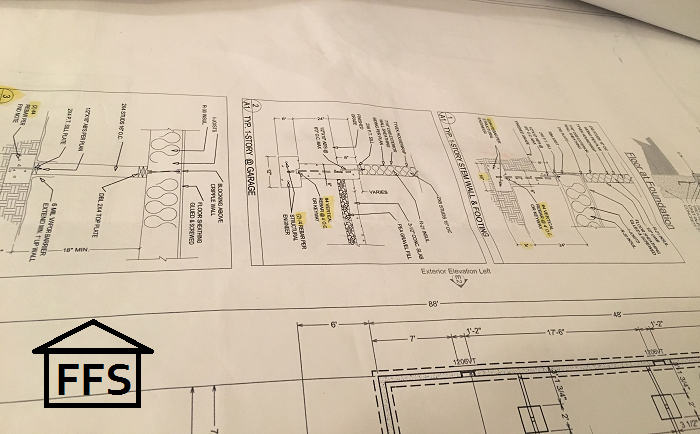
Yours should have little pictures, just like mine, with close ups of what you need for your foundation, your floors, and your walls. They will tell you each little thing or layer you have to put in for your house to be built properly.
From our blueprints, we could see the exact distances and thickness of each wall that would need to be poured. You might be able to see that we have one foundation wall that actually cuts in to the middle of the house. It’s the highlighted 3/A1 in the picture below. We also have several square blocks that needed to be poured around the inside of the house. The fireplace that I wanted in our house will be very heavy because it will be approximately 12 feet tall with rock all the way up. Because of that, we even have a foundation wall poured directly under the fireplace.
 Anything you will have in your house that is excessively heavy (extra large fireplace, load bearing walls, even extra large appliances occasionally), will need a foundation wall poured underneath it. Unless you are building on top of a slab, then the entire thing will have cement supporting it.
Once you understand your foundation blueprints completely, you can start building your forms.
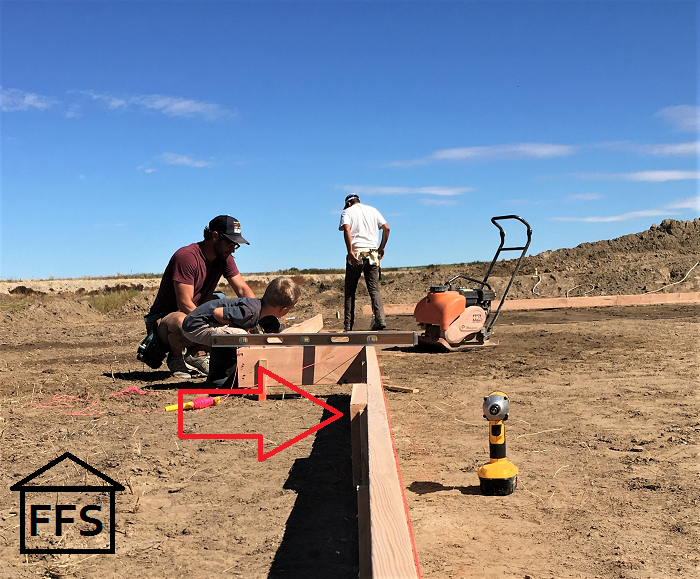
- Measure and stake out all of the exterior footings. Just pound wooden stakes in all of the corners with a hammer.
 Check your corners for square, and double check this is exactly where you want your house. It’s a whole lot easier to move dirt than it is to move cement. In fact, I should just say right now that you will need a measuring tape, a square, and a level for basically every single board you use on your entire house. Get in the habit now of checking every single time that it’s level, that it’s the right size, and that everything is square. Being off by an inch or by a few degrees can get worse and worse with each step if it’s not fixed right away. Check, check, and recheck ALWAYS! And if you find a problem, even a little one, fix it right then.
 - “Thump” the dirt. All of the construction people reading this right now are probably dying. No, thumping is not the technical term for this. The big heavy thing you use is called a plate compactor, but thumper is so much more fun to say. Basically you have to make sure the dirt is 100% compacted before you pour concrete on top of it. If it’s not, you run the risk of the dirt settling underneath it and your foundation won’t have anything sturdy to sit on …. bad bad bad! So you take this handy
little(not so little) thing that looks kinda like the machine the janitor pushes around the school that cleans the floors, and you compact the dirt wherever you will be pouring cement.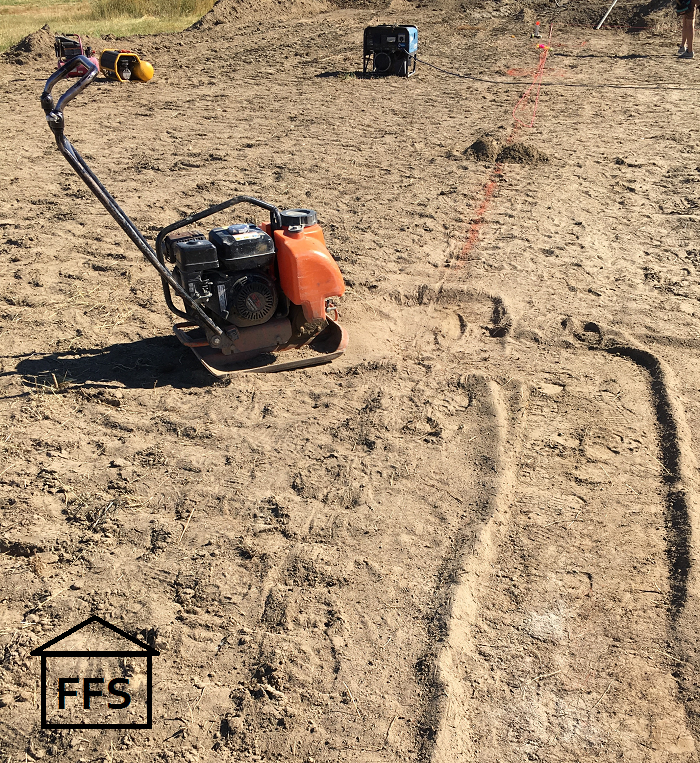 It thumps it’s way along and beats the dirt to compaction. If your dirt is native soil (hasn’t been dug or moved) then you won’t have much compacting to do because it has never been disturbed. Some of you won’t need to do this step, just be sure your house will be sitting on a strong foundation please. Farmer just reminded me that wet dirt is bad for thumping. It can ruin your machine and doesn’t do the job properly. Wait for the dirt to dry first.
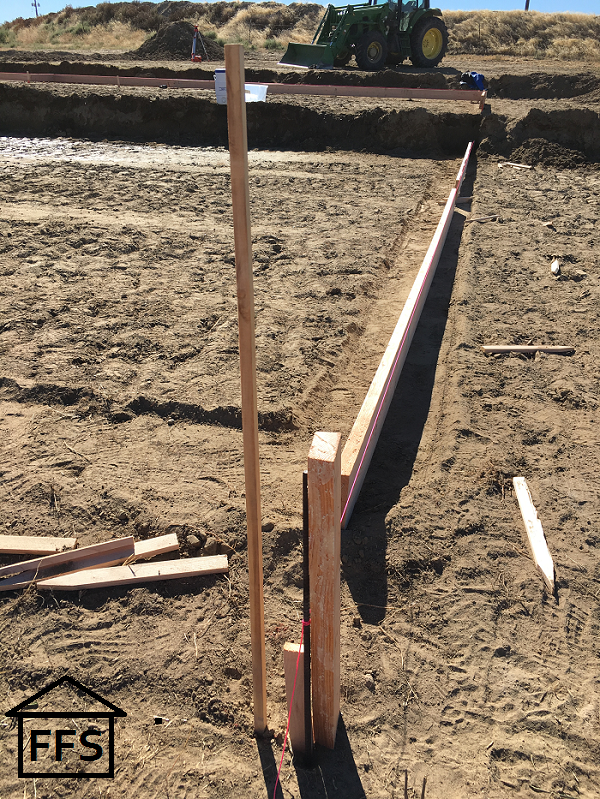
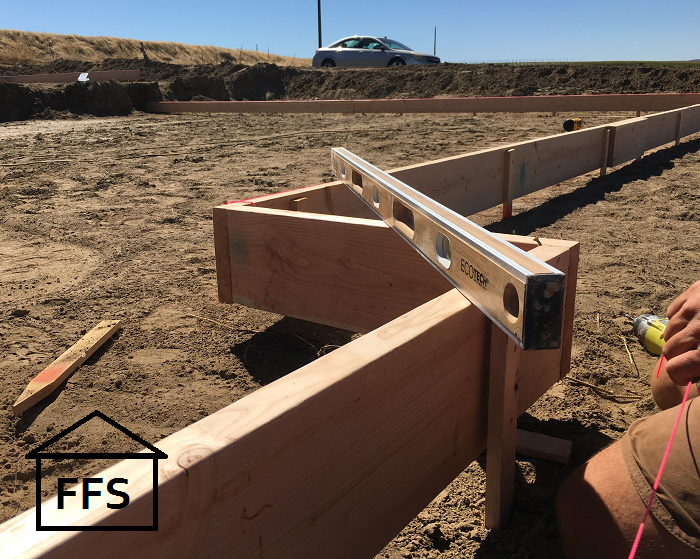
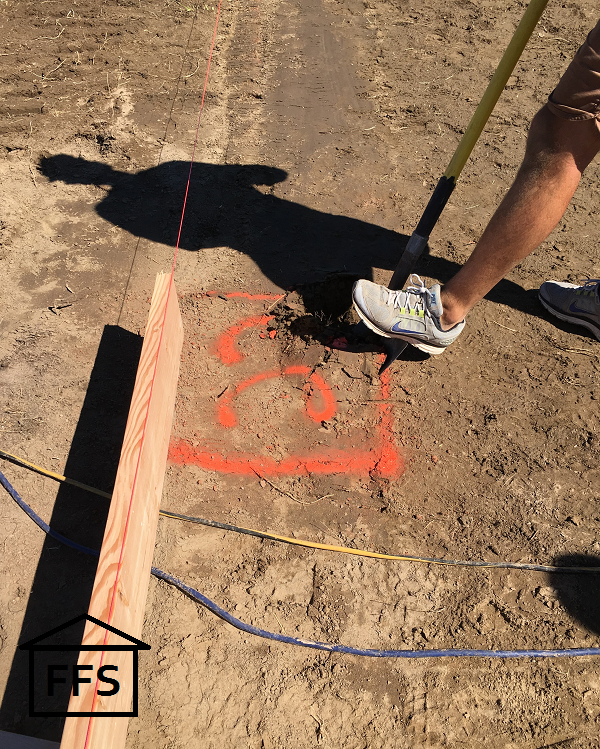
 - Now you are going to run your stringline. A stringline is a handy tool that they use a ton in building a house. I had no idea it would be as useful as it is. When a stringline is pulled tight, it fixes the problem of having to measure and level each board from nothing. Tie your stringline from one stake to another at the height of your footings. Pound your stringline stakes a few feet past where the corners of your forms will be. It is helpful to over run the stringline a bit, so the end stake isn’t in the way. Since you are working with dirt, which is often not perfectly flat, it’s a good idea to err on the high side. (Our footings were supposed to be 8″ tall, so we tied our stringline at 9″ in case it was off anywhere) It won’t hurt anything if your footings are thicker and stronger than they are supposed to be. Use a big level (4-8 feet long) to make sure the stringline is perfectly level. It’s also helpful to spray paint a line all the way around where you are building your forms. Then you will see all the jogs or zig-zags your house pulls and you won’t end up on auto pilot building a concrete form 10 feet beyond where you are supposed to be going. Just follow the lines ….
- Pound wooden stakes into the ground along the stringline every couple of feet. It helps to lay the board out roughly at the same time so you can see it all. Your board will need to line up perfectly with the string, so pay attention as you pound your stakes in. Also think about which side of the board you want to line up with the string. If you set your board on the inside of the stringline, then your board is inside the area where the cement is supposed to be poured. The width of your cement footings will be from the inside of one board to the inside of the board on the opposite side, not outside to outside, or inside to outside. Pound the stakes a little lower than the stringline because you will use the tops of the 2×8 boards to level out the cement when it is poured.
- Use screws to attach the 2×8 boards to the stakes.
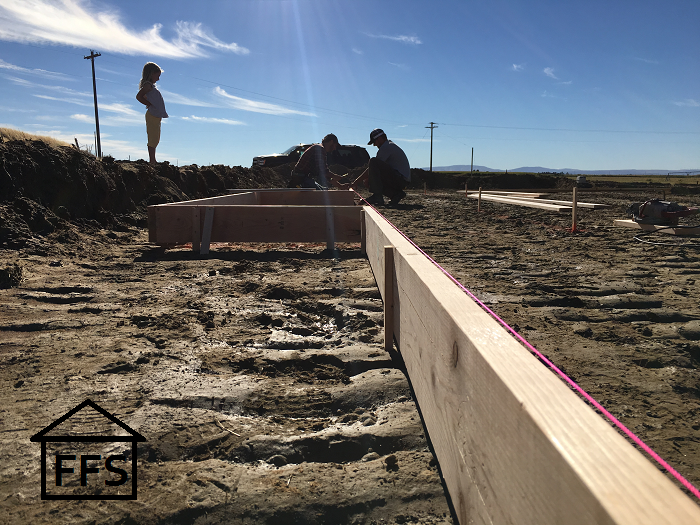 You will be cutting the boards during this step also. Use a piece of 2 x 8, roughly 1 foot long, to attach each board together on the outside. They call this “scabbing”.
 When you come to a corner, you will need to measure and cut your board before you screw it into place. As you move along, double check all of your work. Always make sure everything is level, in line with the string, and even with the board next to it. Even 1/4″ makes a big difference.
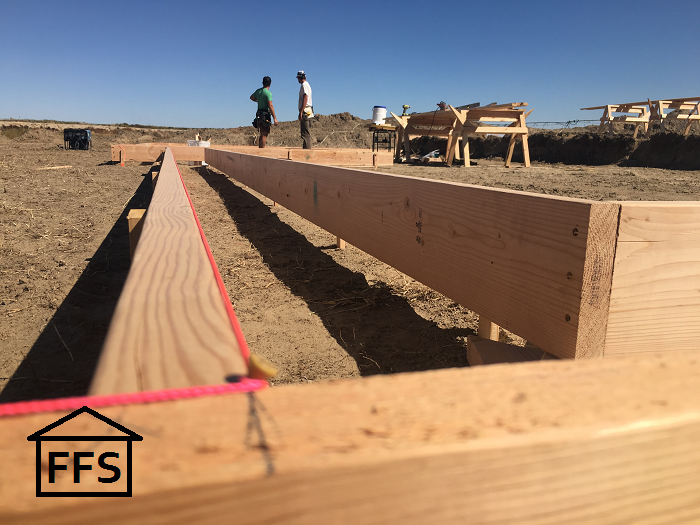
- When you come to a corner, string your next line. Always string the entire length of a wall or it won’t be perfect. Really, I can’t stress how much of a difference it makes when something ends up even a tiny bit off. BE PERFECT, or as close to it as humanly possible. If you run your stringline long a few inches on each end, you will end up with a nice square corner.
- Continue these steps all the way around where your foundation needs to go. You will be relying heavily on your blueprints and following them perfectly. They should tell you all the measurements you need to know. Don’t be afraid to use too many stakes. Cement is crazy heavy, so if it doesn’t have enough support, your form could break or bow out and create a problem.
- Once you have the entire outside line done, you can start on the inside.
 Check your blueprints for how wide your footings are supposed to be. When you run your string line remember to pay attention to which side of the board you are putting it on. If your stringline will be run on the outside of the board, then you will need to add the width of your board to your measurement. Our footings were supposed to be 16 inches wide. So that is what the distance needs to be in between the boards. Be sure!
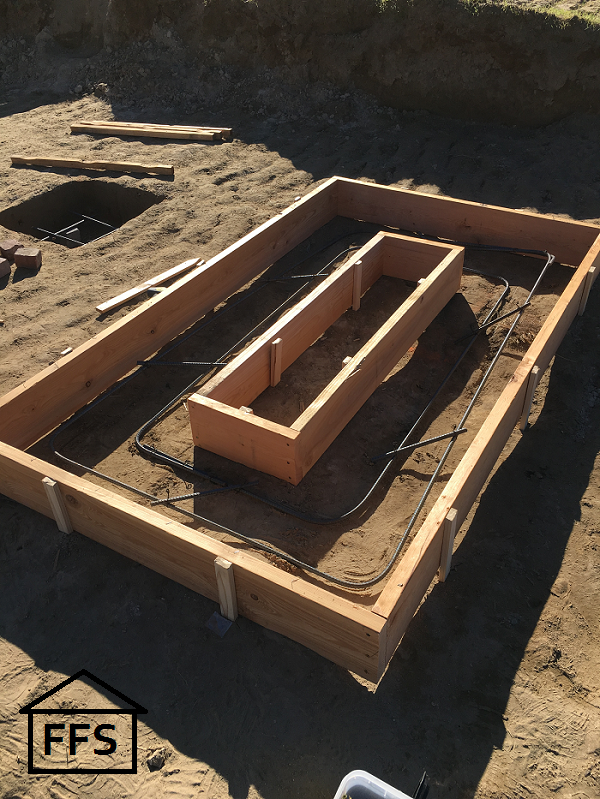
- Watch out for detached sections that need to be formed up for cement. Our fireplace needed it’s own little rectangle of cement poured underneath it for support so we had to measure and build forms right out in the middle. Don’t pay attention to the rebar, we will discuss that is Step 13.
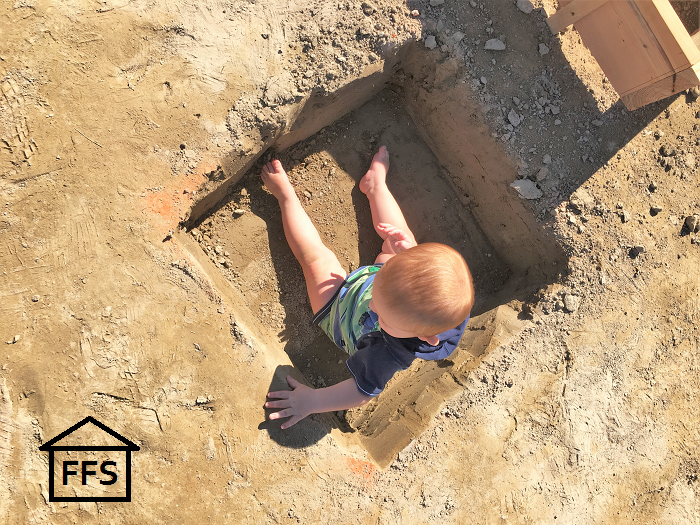
 We also had 2′ x 2′ spot footings which were just little squares 8 inches deep. We could have built forms for them also, but we decided it would be easier and cheaper to dig the forms out of the dirt.
 Because we did that, our spot footings are 8 inches lower then the rest of our footings. Then when we placed the posts on top of the spot footings later, we just cut them 8 inches taller.
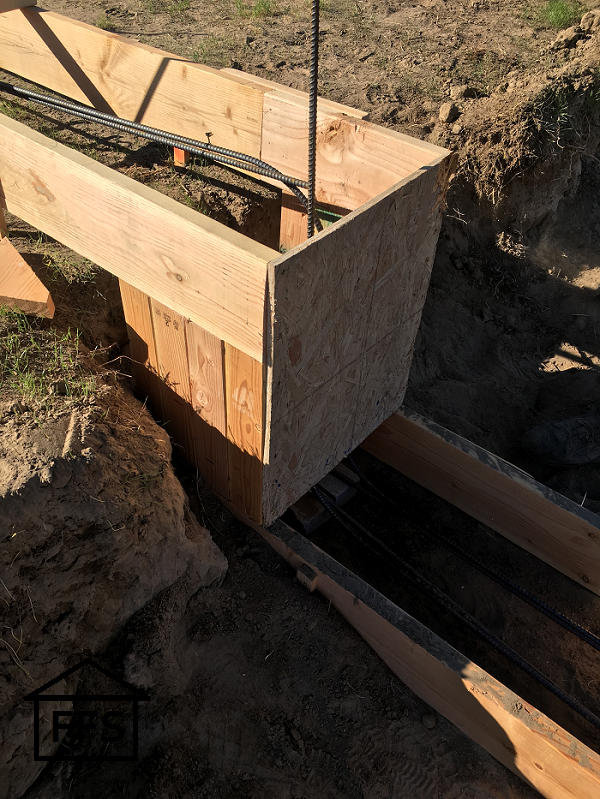
One other thing that was specific to our build was that we needed to build a pillar to connect the two levels of footings. If you recall, our excavation was done on two levels because of the large slope our house was being built on. Well, the footings have to be connected and the rebar, which we will talk about in the next step, has to be unbroken. So we needed to build a box or a pillar where the dirt stepped down in order to form a solid connection. If we were pouring water into our forms, this would have been a lot more difficult. Since cement is rather thick, our box just needed walls to hold it in basically. We built a frame with a few 2 x 4’s and a piece of plywood. It doesn’t have to look pretty, it just has to hold the cement! Again, don’t pay attention to the rebar in it, we can talk about that later.
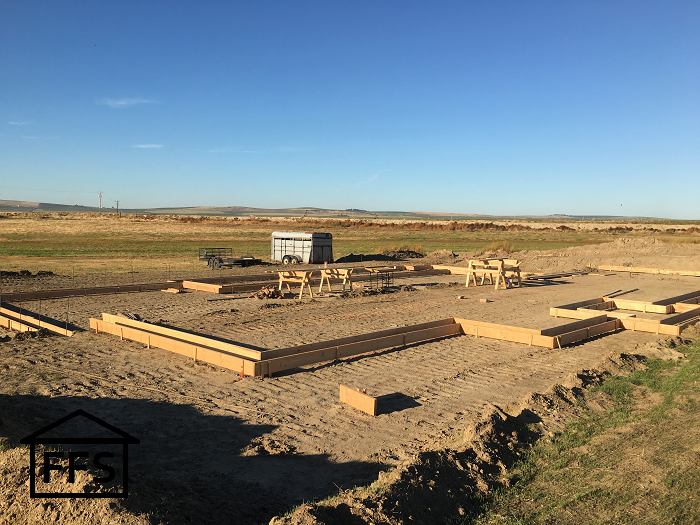
Building concrete forms is something that you can absolutely do. It’s not super complicated, just time consuming and you have to make sure your measurements are correct. The important things are that:
- Your forms are in the correct places
- Your forms are the correct width and depth
- Your forms are level and straight
- Your forms are supported enough that they won’t break when concrete is poured
If we built another house, which we won’t …. but IF we did, building the footing forms is something I wouldn’t hesitate to do myself. Really, I think I could manage it even without Farmer. It would take me forever, but it is not complicated.
So what exactly did we do?
My older brother works in construction. A few months before we started building, we started talking to him about the possibility of hiring him. We ended up not being able to make it work because of timing and schedules, but he did introduce us to a friend of his that had lots of experience in construction. Farmer and I checked prices all over, but what we were really concerned about was finding ways to save money. We didn’t just want to hire someone to do the work, we wanted to be able to work with them to save ourselves some money. Finding someone who is willing to do that, is really hard to come by. Besides, it’s pretty hard to come up with a $ number when you don’t know how much help you can provide or how many hours you will be available.
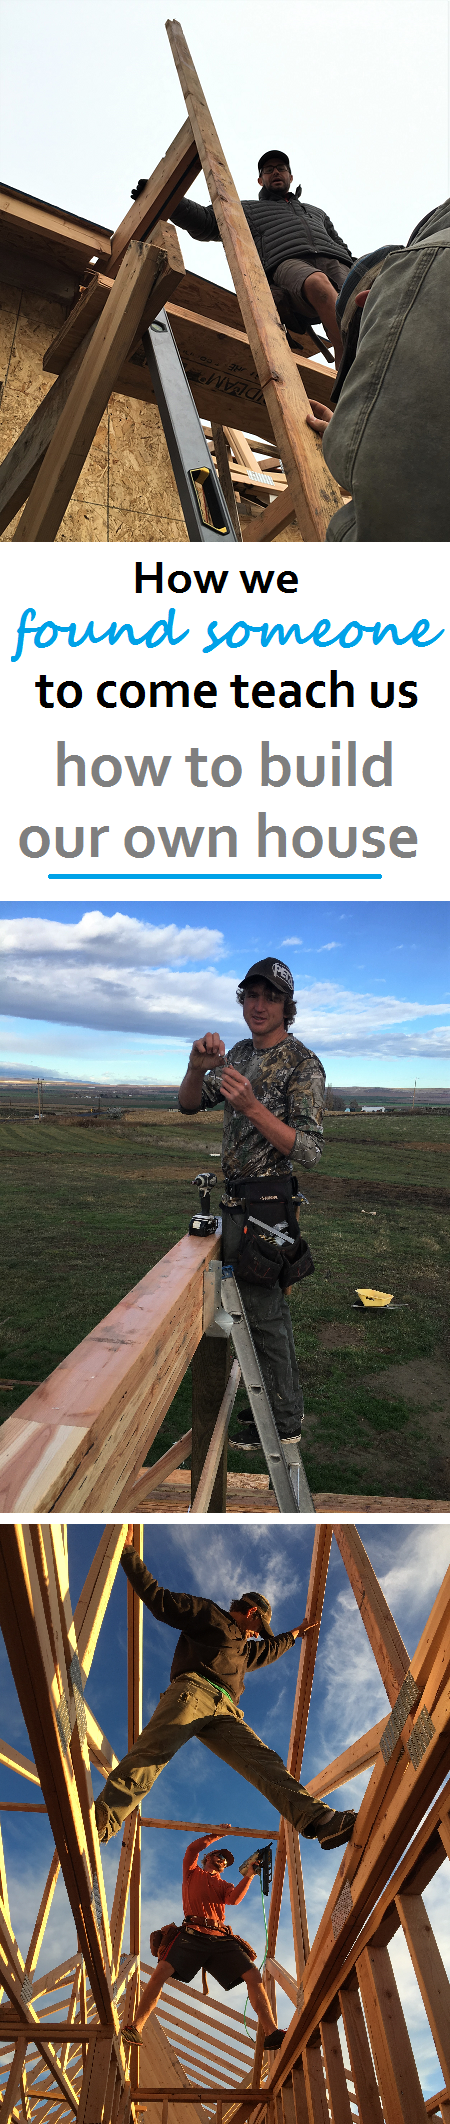
Which brings me back to my brother’s friend, Josh Kitchen. I was sold on Josh pretty much after the first conversation I had with my brother about him. He grew up in construction literally. And better still, he was willing to work with us however we wanted him to. He liked the idea of Farmer helping out whenever he could. He also supports owner-building and finding ways to save money.
Did I mention he lives in Utah? That is four states away from us dang it! Even after factoring in moving up here and travel time, it was still cheaper for us to hire him than it was to hire a construction crew in Washington.
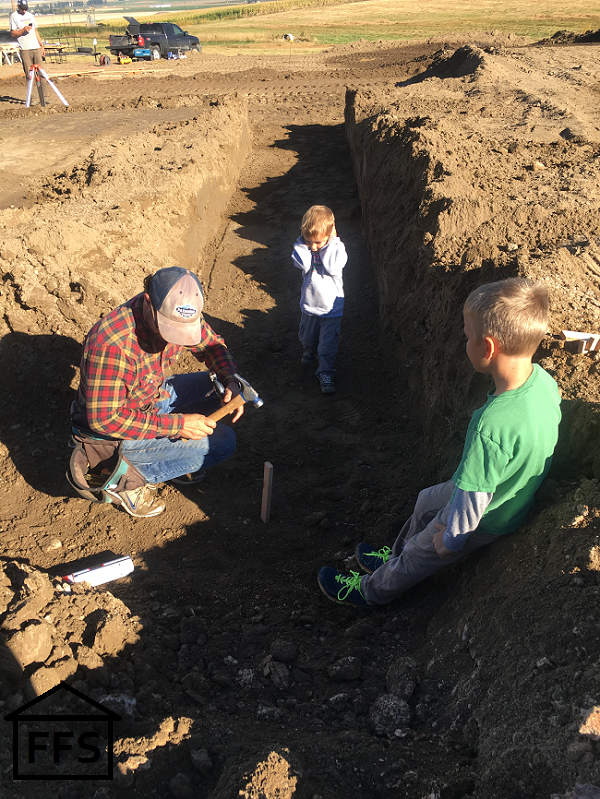
So we hired Josh of course! And then later we hired two other guys (Matt and Mikey also in the picture above) but I will tell you about them when they came on to the job in a few weeks.
If Farmer wasn’t helping out as much as he could, it probably wouldn’t have saved us money to hire josh to move up here for a few months and work for us. But this was exactly what we were looking for. Someone who would work with us but could also work on his own if he needed to. Someone who came highly recommended and we knew would do a good job on our house.
So, for the next few months, I will be mentioning Josh a lot because we hired him to get us to “dried in” stage. Which means he started working for us on ground breaking day, then on through concrete forms, pouring our foundation, building our floor, framing our walls, pouring our garage slab, rolling our roof trusses, and sheeting the roof. He worked right along side of our whole family, teaching us what to do and explaining everything the whole time. I still feel like it was a huge blessing that we found him because it made my job so much easier. Instead of having to work with a few different sub-contractors for foundation, cement, and framing, I got to work with one guy who understood and supported our plan. The communication was easier with one guy instead of 3 or more different subs, and it ended up saving us money because of the deal we made with him.
As a bonus, he is incredible with kids. My 7 year old basically lived at the construction site because he loved helping Josh. I can’t even begin to tell you how valuable I feel this experience will be for my son because Josh was willing to explain everything to him. A few weeks in, Little Man started building his own tiny house next to our big one. He copied everything Josh told him, and built a little box house with a floor, walls, and a roof that stood strong even when they had to lay our huge house trusses on top of it.
If any of you are interested in talking to Josh about your job, shoot me an email and I can get you his information. I only recommend honest and hard working people, and Josh is exactly that.
Now, are you ready for the final numbers? Of course you are.
Time: 4 days
Building the forms for the footings on nearly 5,000 square feet took 4 days. We had 1 guy working on it full time, and Farmer helped out quite a bit too. So this accounted for days 2-6 of construction, but one of those days was a Sunday and we don’t work on the house on Sundays.
We could have saved time if I had everything I needed there when we started. I had to run to town many times to grab things, and a few of those times the guys ended up waiting for me before they could move on.
Cost:
Labor ……………………………………………………………… $896
Materials ………………………………………………………… $873.34
Total ………………………………………………………………. $1769.34
Farmer worked with Josh for more than half of the time for the footing forms. Which means we saved about $500 on labor. Like I said before, if we ever built another house this would be one of the things we absolutely do ourselves. That would have saved the $896 in labor, but would have taken us 5 or 6 days I am guessing, instead of 4.
The materials that we had to purchase for footing forms were the 2×8’s, wooden stakes, stringline, screws, a 4 foot level because all we had was a small one, a few extra saw blades, and the spray paint. The 2×8’s cost $550, however, one of the reasons we chose to do it this way was so we could reuse the lumber. The 2×8’s were used, with a little cement still on them, inside our roof a few months later. They will never be seen so the cement doesn’t matter. So there is another $550 saved later on.
All of the other tools and supplies on the list clear up at the top of this post we already owned, with the exception of the plate compactor which we borrowed from a friend.
What this cost outline DOES NOT include is fuel. I tried to keep track of my fuel expenses in the beginning, but it was immediately obvious that it would be impossible to separate what we used for building our house and what we used for everything else. If I make a trip to town to get building supplies, go to the grocery store, and take the kids to soccer practice, what do I count it as? See my point? So none of my cost outlines include the fuel used.
Ok so any questions? Do I need to explain anything better? Leave me a comment or send me an email!
If you need to go back to Step 11: Excavation CLICK HERE
CLICK HERE to move on to Step 13: Rebar in your footings
If you found this post useful, please spread it along by pinning any of the pictures in this post. Actually, why don’t you just pin all of them? Yes, yes that would be good.
You’re the best!
~Farmer’s Wife
FREE checklists and schedules
Access to the resources I created that helped Farmer and I save over $75,000 building our own custom dream home.
Was just wondering why you never touch on houses with basements? I feel like they are pretty common as well.
Hey Ashley, it is because I don’t have experience with basements. Our house has a crawl space so that is what I can share information about. Yes basements are common and a great option as well though!